What Items Impact the Webflow Page Load Speed
The items that impact your Webflow page load speed the most are scripts that demand heavy processing, an overabundance of web fonts requiring separate downloads, and uncompressed images that hog bandwidth.
These elements, while enhancing functionality and aesthetics, can be the Achilles' heel of your website performance.
However, overcoming these obstacles is simple. Partner with our Webflow SEO agency to ensure your site performs at its best and stays competitive in both speed and search rankings.
Why Speed Matters For Your Webflow Site
Many businesses consider Webflow because it allows to build a website without coding. Diving deeper into Webflow-specific optimizations, the importance of an optimized site becomes even more evident. In a digital landscape where a delay of even a second can lead to a 7% reduction in conversions, ensuring your Webflow site is lightning-fast is paramount.
Research indicates that 53% of mobile users abandon sites that take longer than three seconds to load. This isn't just about the user experience; it's about your bottom line.
A fast-loading Webflow site not only retains visitors but also ranks higher on search engines, leading to more organic traffic. Google, in its emphasis on user experience, factors in load speed when determining search rankings.
So, if you're looking to outpace your competitors in the Webflow arena, both in terms of user experience and SEO, optimizing your Webflow website performance is non-negotiable.
Tip: Before you dive into revamping your site settings, read our ultimate guide on Webflow optimization to avoid common pitfalls and stay on the right track.
.webp)
How to Properly Run a Webflow Speed Test
Webflow is without a doubt the best website builder. In the quest for a lightning-fast Webflow site, knowing how to measure your current speed accurately is the first step. Without a proper benchmark, you're shooting in the dark. Let's delve into the most effective methods to test your Webflow load speed.
Using Incognito Window on Chrome
When testing your Webflow load, it's essential to get a clean slate, free from cached data and cookies that might skew the results. This is where Chrome's Incognito mode comes into play. By testing in an environment that mimics a first-time visitor, you get a clearer picture of your site's actual load time.
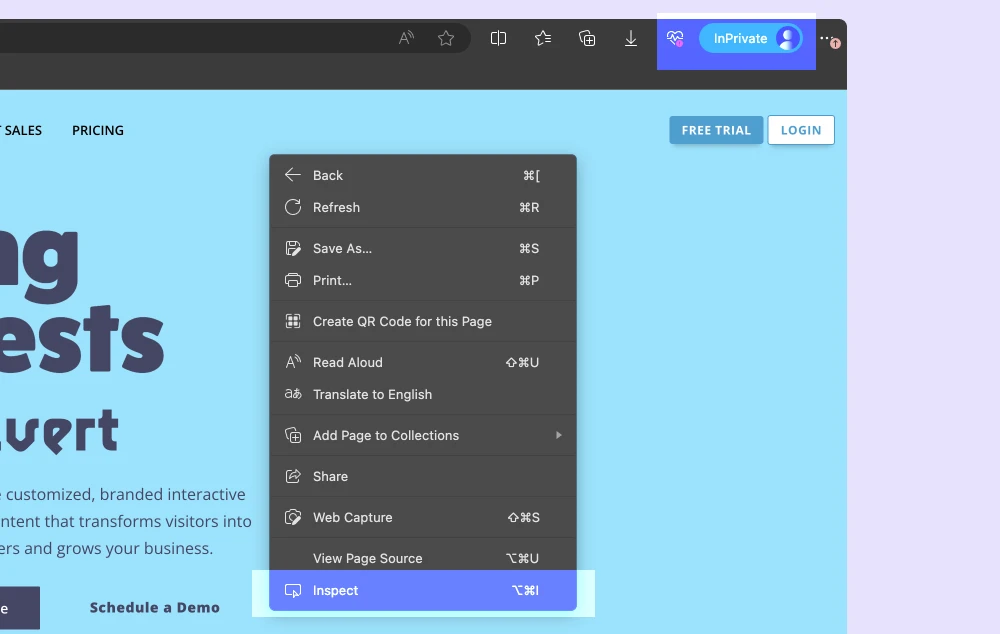
Steps to Access Lighthouse on Chrome/Edge:
- Open Google Chrome and navigate to the Webflow site you want to test in a new incognito window.
- Right-click anywhere on the page and select "Inspect" to open Chrome DevTools.
- In the DevTools panel, click on the "Lighthouse" tab.
- Ensure the "Mobile" option is selected for a mobile-focused audit.
- Click on the "Generate report" button. Lighthouse will then run a series of tests on your site and provide a detailed report.
Feeling overwhelmed? Our experts in CRO web design can help. We'll take the complexity out of optimizing your Webflow site—from audits to actionable strategies—guaranteeing higher conversions.
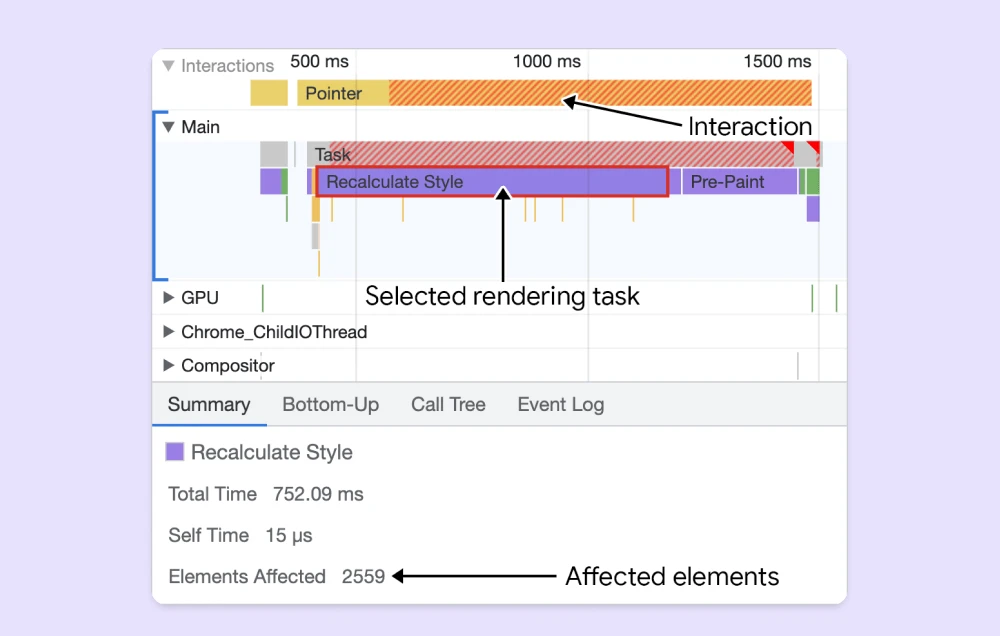
Google Web Vitals Audit with Lighthouse
Google's Web Vitals, powered by Lighthouse, provides a comprehensive overview of your site's performance, focusing especially on user experience metrics. When running this audit, prioritize mobile testing and core web vitals.
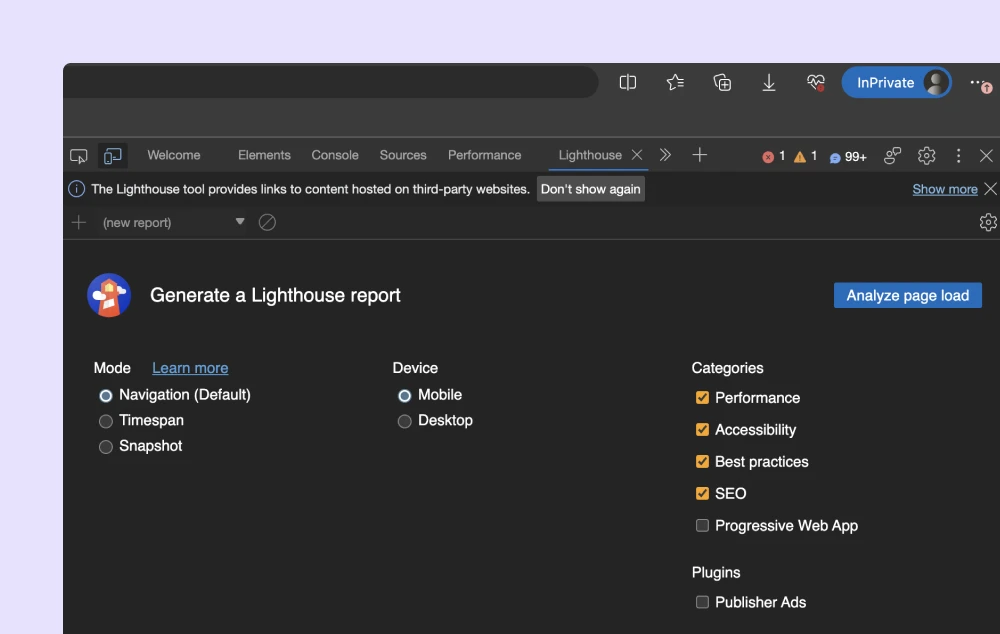
Why? Because a significant chunk of web traffic now comes from mobile devices. Especially if you do SEO and run a blog post. Here's a breakdown of the primary metrics you'll encounter:
Largest Contentful Paint (LCP)
This metric measures the time it takes for the main content of your Webflow page to become visible. It's crucial because users want to see meaningful content as soon as possible. A good LCP score is under 2.5 seconds.
First Input Delay (FID)
FID gauges the time from when a user first interacts with your page (like clicking a link) to when the browser responds to that interaction. A good FID score is under 100 milliseconds, ensuring users get a responsive experience. Core web vitals are crucial for measuring website speed and user experience.
Cumulative Layout Shift (CLS)
CLS quantifies how much unexpected movement occurs on your page. For instance, if ads or images load and push content around, it can be disorienting for users. A good CLS score is under 0.1.
Time to Interactive (TTI)
This metric measures the time it takes for a page to become fully interactive, meaning all the elements are rendered, and event handlers are registered for the visible elements. A good TTI is under 3.8 seconds.
Speed Index (SI)
SI indicates how quickly the contents of a page are visibly populated. The lower the score, the better, with a good SI being under 4.3 seconds.
Total Blocking Time (TBT)
TBT quantifies the total amount of time when the main thread was blocked for long enough to prevent input responsiveness. Consider to preload and preconnect your assets for a faster TBT. A lower TBT means a more responsive site.

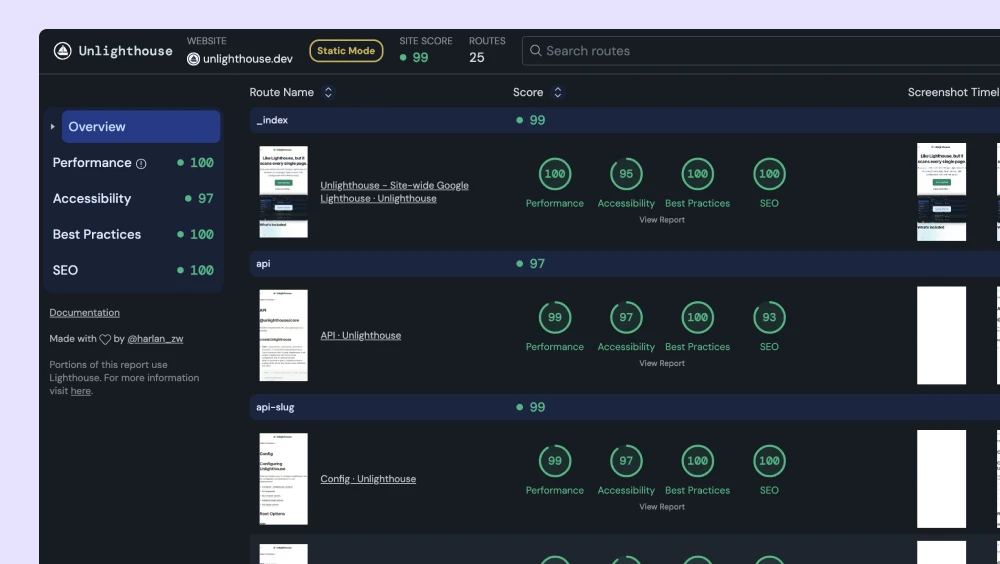
Introduction to 'Unlighthouse' Library
While tools like Lighthouse are invaluable, sometimes you need a more tailored approach. Enter 'Unlighthouse', a library designed to give you more granular control over your speed tests. By allowing you to customize parameters and focus on specific aspects of your Webflow site, 'Unlighthouse' can provide insights that generic tools might miss.
Accurate speed testing is the foundation of any optimization effort. By using tools and methods tailored to Webflow and keeping in mind the ever-growing mobile audience, you set the stage for impactful speed enhancements.
Optimize Fonts for Better Webflow Performance
Fonts might seem like a minor detail, but when it comes to Webflow spage speed optimization, they play a significant role. With fonts accounting for 15-20% of your page speed, overlooking their optimization can be a costly mistake.
The Weight of Fonts on Your Site
Every font you add to your site comes with its weight, both in terms of file size and the rendering process. Fonts are essentially made up of "glimpses" – vector files with intricate points and curves. These details, while making the font look appealing, can also add to its load time.
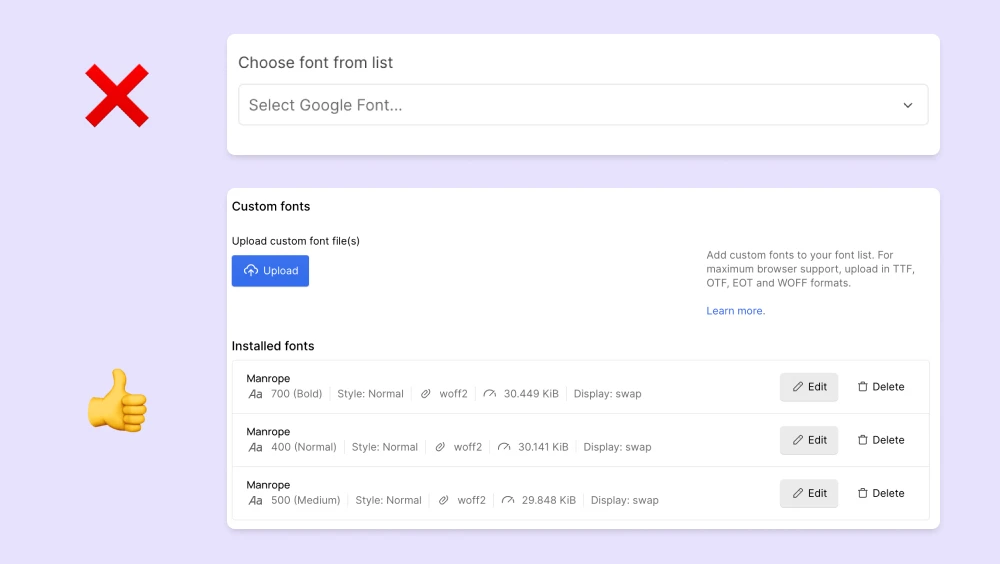
The Pitfalls of Using Google Fonts Directly
While Google Fonts offers a vast and versatile library of fonts, using them directly in Webflow can have unintended consequences for your site's speed. Here's why:
- Additional HTTP Requests: Every font or font variant (like bold or italic) from Google Fonts adds an extra HTTP request. These requests can accumulate quickly, especially if you're using multiple font families or styles.
- External Hosting: Since the fonts are hosted on Google's servers, your site becomes dependent on an external resource. Any delay or downtime on Google's end can affect your site's load time.
- Redundant Font Variants: Often, websites load multiple variants of a font that they don't actually use. This unnecessary bulk can slow down your site.
- API Script Overhead: As mentioned earlier, Google Fonts uses an API script. This script, while facilitating the use of the fonts, also introduces additional overhead, leading to more requests and potential redirects.
By uploading optimized WOFF2 fonts directly to Webflow, you bypass these pitfalls, ensuring a more streamlined and faster-loading site.
Optimizing Font Files
One of the primary ways to optimize fonts is by refining the font file itself. A tool like FontForge, as demonstrated in this font optimization video, can be invaluable in this process. Once optimized, it's recommended to use the WOFF2 format for fonts. Adding preconnect to load images faster can also improve website speed.
Why? WOFF2 is not only highly compressed but also enjoys support from the majority of browsers. But there's a catch when working with Webflow. Avoid using Google Fonts directly, as it introduces an API script, leading to additional requests and redirects.
Instead, upload your optimized WOFF2 fonts directly to Webflow. And for an added website performance boost, set the font display to "swap", ensuring text remains visible during font loading.
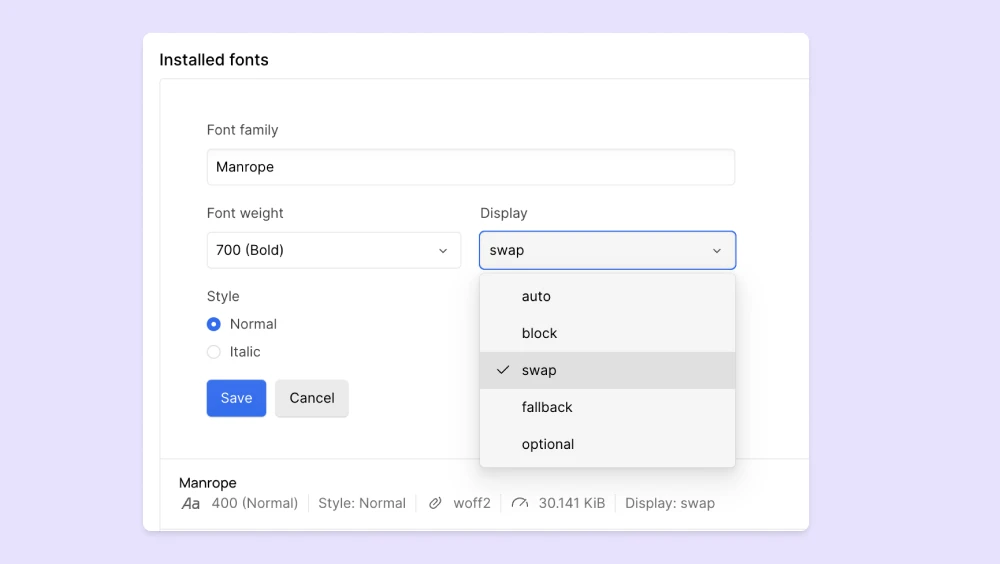
For those who might not have FontForge or prefer an online solution, cloudconvert.com is a handy tool that allows you to convert TTF files to the more efficient WOFF2 format.
The Power of OS Fonts
Another avenue for optimization lies in OS fonts. These are fonts already installed on user devices, like Arial or Times New Roman. By leveraging these fonts, you eliminate the need for additional scripts or font files, ensuring a faster load time. It's a simple yet effective way to shave off precious milliseconds from your site's load time.
Fonts, while enhancing the aesthetics of your Webflow site, can also be its performance bottleneck. By optimizing font files and smartly leveraging system fonts, you can strike a balance between beauty and speed.
Lazy Loading Scripts Using Google Tag Manager
Google Tag Manager (GTM) is a powerful tool, but it can impact your Webflow site's load time. The solution? Lazy loading your GTM container with a custom JavaScript script:
Understanding the Lazy Loading Script
This script waits for a user's first interaction—be it a scroll, touch, or mouse movement—before loading the GTM container. This ensures GTM doesn't hinder the initial page load, offering users a snappier experience.
Setting It Up in Webflow
- Go to your Webflow project settings.
- In 'Custom Code', paste the script into 'Footer Code'.
- Replace 'GTM-XXXX' with your GTM code.
- Save and publish.
Lazy loading GTM ensures critical site content loads first, enhancing user experience, especially for mobile users or those on slower connections. Lazy loading GTM strikes a balance between functionality and speed, optimizing your Webflow site's performance. It is particularly effective for improving website speed and core web vitals.
Optimize Images and Convert Them to WEBP
Images play a pivotal role in making your Webflow site visually appealing—a fact well known to Webflow designers. However, they can also be the largest contributors to page size, affecting load times. The solution? Optimize your images and consider converting them to the WEBP format.
The Weight of Images on Your Site
High-resolution images, while stunning, can drastically slow down your site. Large image files take longer to download and render, especially on mobile devices or slower connections. This can negatively impact metrics like Largest Contentful Paint (LCP), a key Google Web Vitals metric.
The Power of WEBP images
WEBP is a modern image format that offers superior compression compared to traditional formats like JPG or PNG. This means smaller file sizes without compromising on quality. Benefits include:
- Faster load times due to reduced file sizes.
- Better image quality at the same compression levels.
- Support for both lossy and lossless compression.

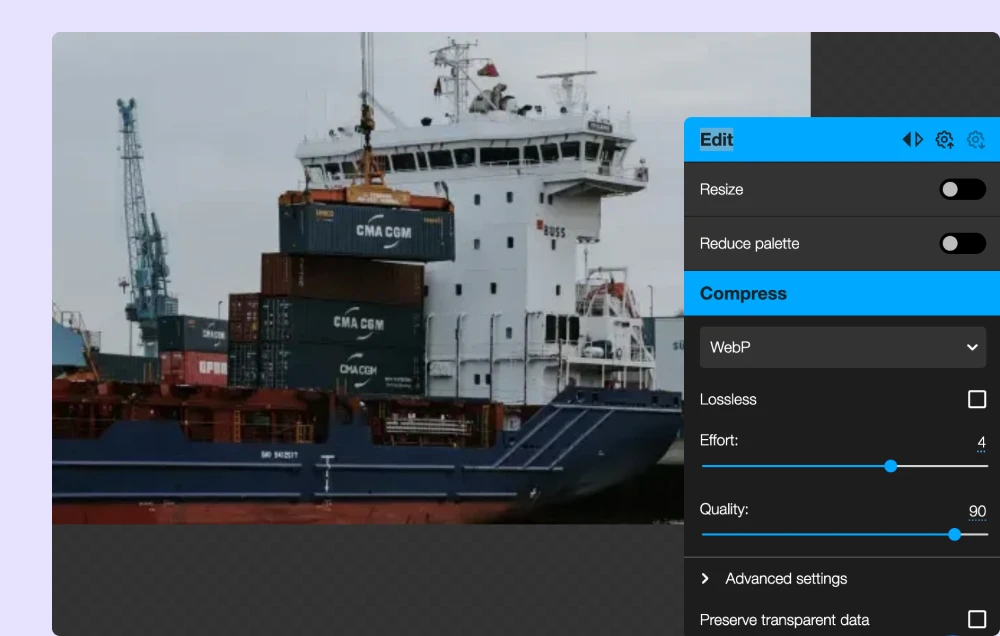
Using Squoosh to Convert Images
Squoosh is an online tool that not only compresses images but also allows for easy conversion to the WEBP format. Here's how to use it:
- Visit the Squoosh website.
- Upload your JPG or PNG image.
- Choose the desired compression settings.
- Select the WEBP format for conversion.
- Download the optimized image and use it on your Webflow site.
Best Practices for Image Use on Webflow
Descriptive Images: Use images that add value, like charts, product mockups, or infographics.
Toggle Off Large Images on Mobile: Hide wide or large images on mobile devices to improve mobile load times.
HTML vs. CSS background Images: Use HTML images for content and CSS for design elements. HTML images can be lazy-loaded, improving load performance. Also, use embed SVG code where possible. This will reduce the total number of assets/resources that are being loaded initially.
Image Count: Limit the number of images per page. More images mean more HTTP requests, slowing down your site.
Optimizing images and converting them to WEBP can significantly boost your Webflow site's speed. Switching CSS background images to normal HTML images will allow your browser lazy loading your assets. With tools like Squoosh, the process becomes seamless, ensuring your site remains visually appealing without compromising on performance.
Optimize Webflow Page DOM Structure
The Document Object Model (DOM) is the backbone of any website. It's a structured representation of your site's content. However, a bloated or poorly structured DOM can be a silent speed killer not only for your Webflow site but for any website builder. Let's explore why and how to optimize it.
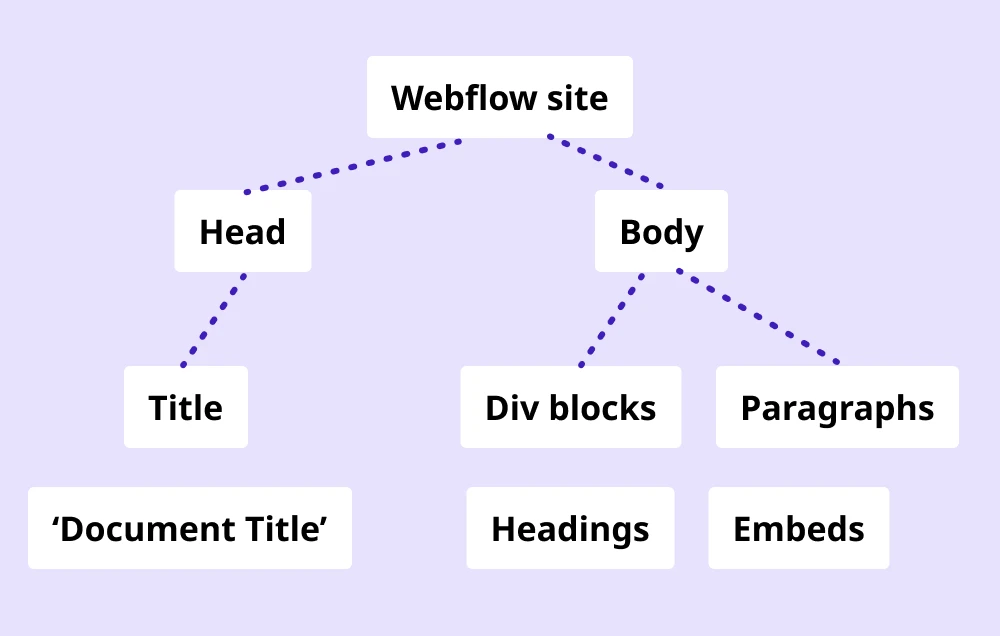
What is the DOM?
In simple terms, the DOM is like a tree diagram of your website. Each element, from paragraphs to image elements, is a branch or leaf on this tree. The browser reads this tree to render your website.
A heavy DOM can:
- Slow Down Rendering: Browsers take longer to process and display content.
- Increase Memory Usage: More elements mean more memory consumption, affecting performance, especially on mobile devices.
- Complicate Interactivity: JavaScript interactions can become slower and less responsive.
Best Practices for a Lean DOM in Webflow
The best page structure and development start with the design tool you're using. We always say Figma is 80% and Webflow is only 20% of the entire website building job. We've outlined an entire article on how to build a website in Webflow in case you're looking to re-develop yours from ground up.
When it comes to your DOM (ie. page structure), here are the best practices to follow:
Limit Nested Elements: Avoid wrapping elements in multiple layers of divs or containers. Each additional layer adds to the DOM's complexity.
Avoid Unnecessary Wrappers: Pages don't always need a "Main" wrapper. Sections can often be nested directly inside the body element.
Simplify Containers: A container should be as simple as possible. Avoid having too many child elements within a single container.
Use Semantic HTML: Elements like <header>, <nav>, and <article> not only make your code more readable but can also reduce the need for additional divs.
A lean DOM is crucial for optimal Webflow performance. By understanding the DOM's role and following best practices, you can ensure a faster, more responsive site without compromising on design or functionality. Load images at appropriate image sizes